
I’m a trained mechanical engineer practicing as a software engineer and love growing my own food. I’ve been developing my skills in working toward closed loop food production, efficient propagation, soil health and compost at a community garden in Melbourne.
The garden is currently all manual, including the watering roster. This mostly works well, but sometimes people forget. And this is a problem in hot weather, when not watering for a day can wipe out weeks of seedling growth in the greenhouse.
After experiencing this a few times, I became curious to automate the watering in the greenhouse.
Objectives and requirements
Building a watering system that’s reliable was the top priority. And if the system for some reason malfunctions (most systems do at some point), I’d like to be notified as soon as possible.
The constraints I was working with: We don’t have electricity on-site, so the system needs to be self sufficient for its energy needs. We do have a mains water on-site, but the tap is far away from the greenhouse, so not depending on a tap for water is also desirable.
Finally, I’m interested in how simple and affordable these systems can be, as a lot of IoT can seem complex and out of reach cost-wise.
System
The system I designed and built consists of 3 subsystems. The power system, the watering system and the control system.
Power system
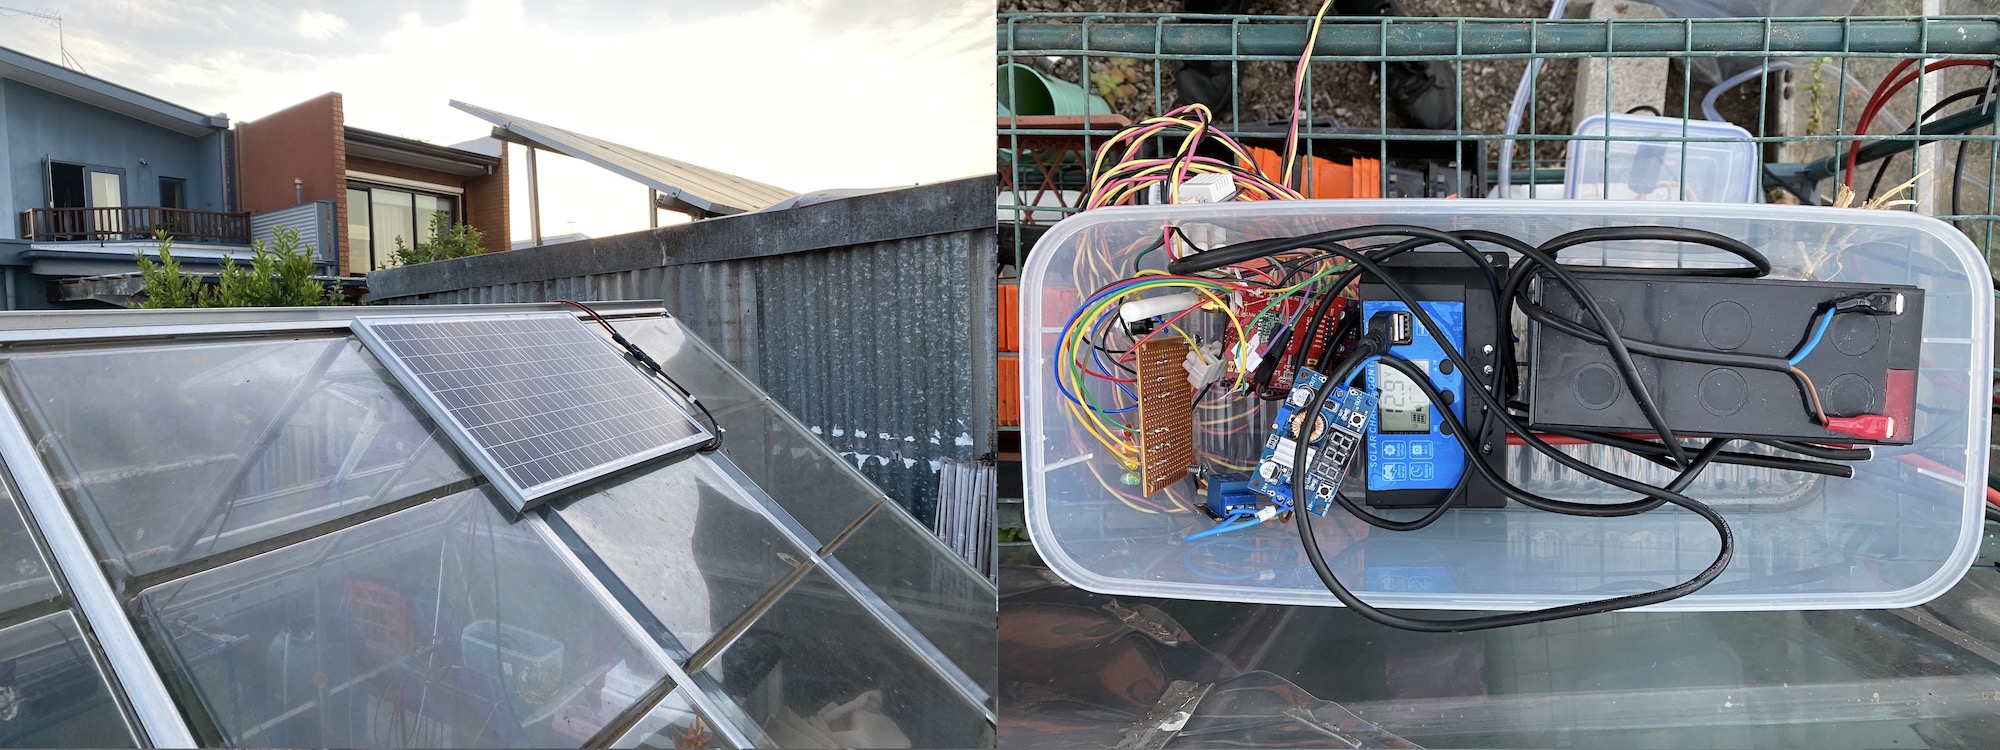
The power system provides the power to drive the other subsystems. It consists of a solar panel, mounted on the north side of the greenhouse. The solar panel is connected through a solar charge controller to a battery. The charge controller ensures that the battery isn’t overcharged and that current doesn’t flow from the battery to the solar panel when the solar panel isn’t generating electricity. The charge controller also supplies power to the control system and the watering system.
Water system
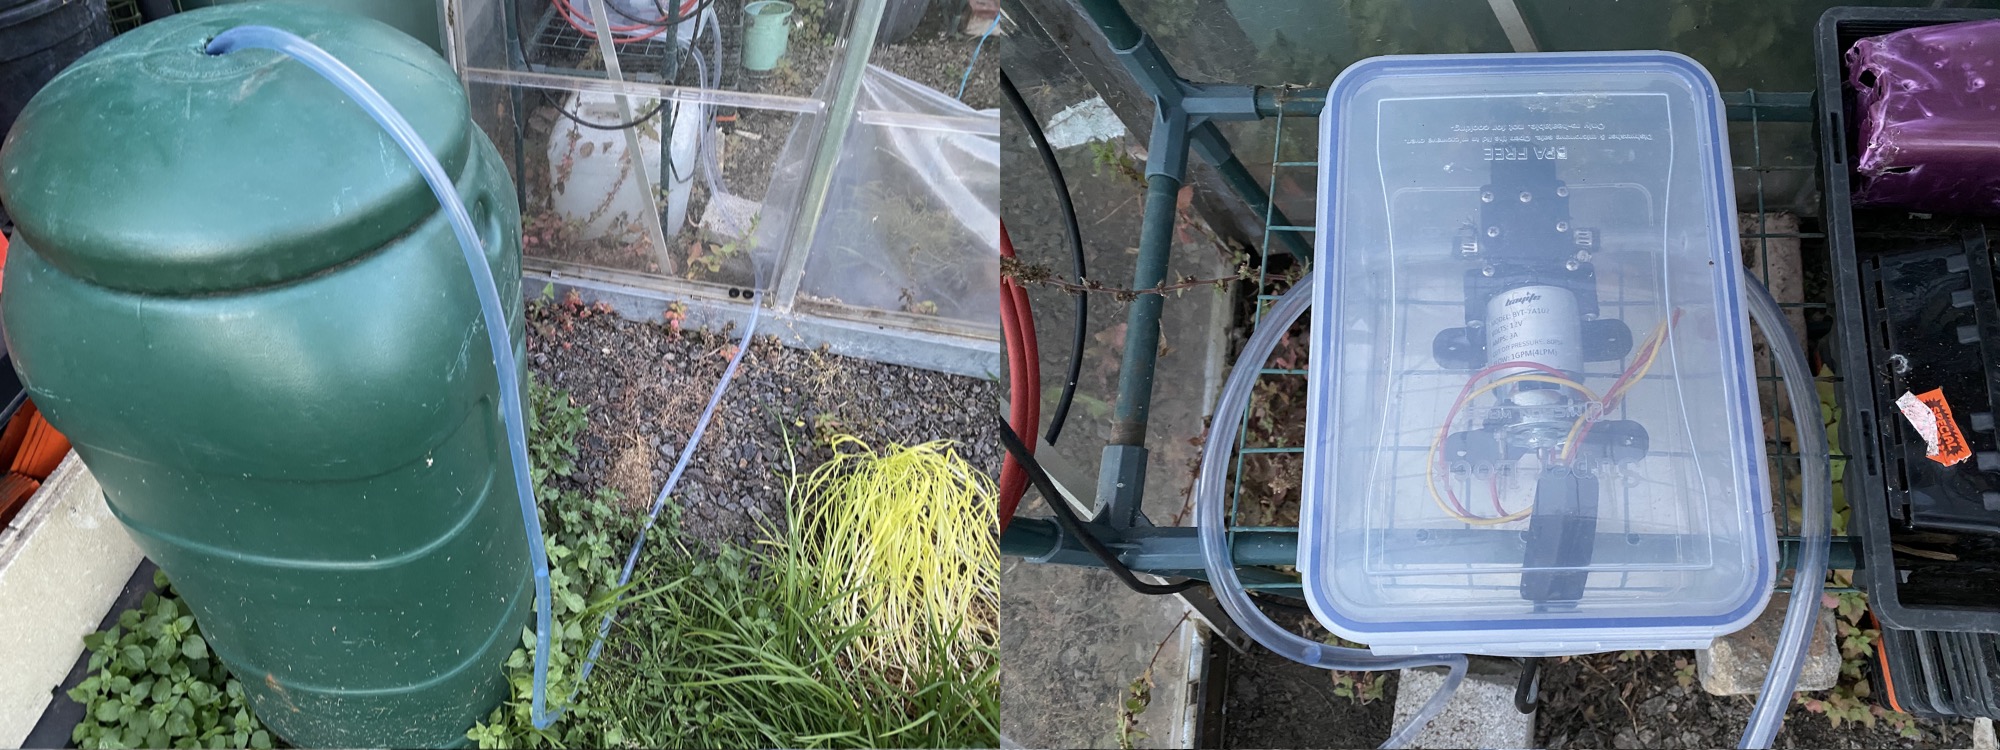
A diaphragm pump, pumps water from a reservoir outside the greenhouse through a number of misting nozzles positioned over the seedlings. I decided on a diaphragm pump because it doesn’t break when it runs dry - and because I’m using a reservoir as a water resource, there’s always a chance it runs dry at some point.
Control system
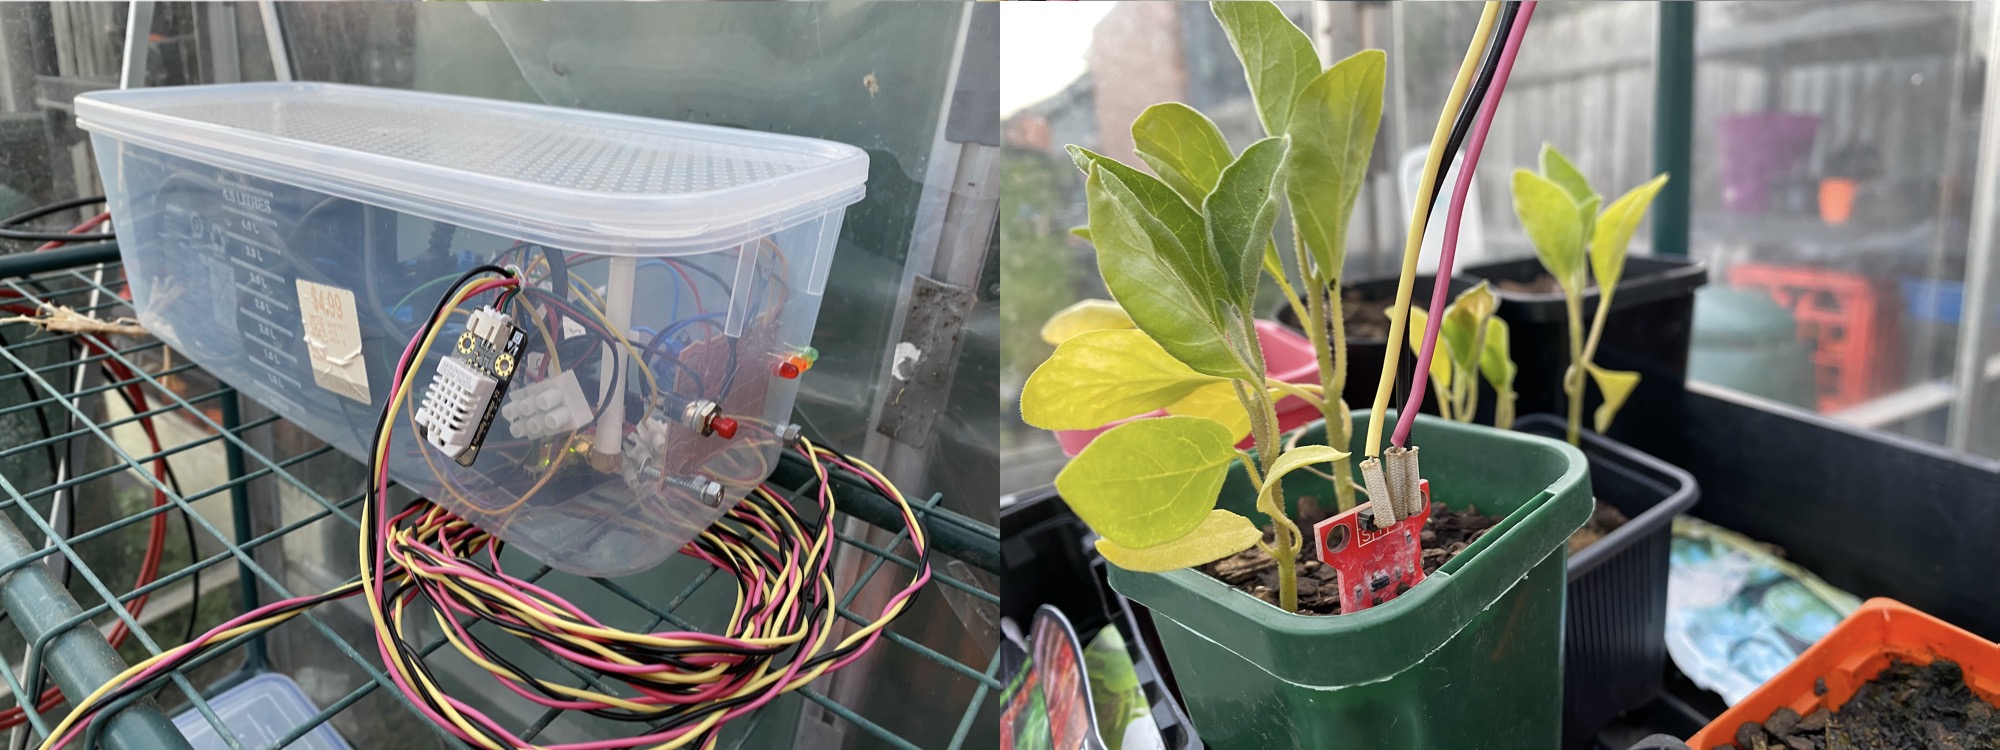
The system is controlled by an Arduino. Its main input is a soil moisture sensor that’s placed in one of the seedling containers. The Arduino reads the sensor value periodically, and if the soil moisture falls below a certain threshold, the Arduino switches a relay. This turns the pump on. A relay is used because the pump requires more power than the Arduino can provide. After a few minutes the Arduino switches the relay again to turn the pump off, and the cycle starts over.
Apart from this fully automated mode, the misting system can also be forced on and forced off. Switching between these modes is done through a push button, with LEDs indicating which mode is selected.
The control software switches to time-interval based misting when a sensor output below a certain value is measured. This is to prevent the misting system being permanently switched on if the moisture sensor breaks down or is accidentally removed from the soil. Because I was curious about the overall conditions in the greenhouse, I also added a DHT-22 sensor to the system to measure temperature and humidity.
Finally, there is a buck converter between the pump and the charge controller to reduce the voltage supplied to the pump. This is necessary as running the pump on 12V produces too much water pressure in the misting system, resulting in blown out nozzles.
To make sure I know what’s going on with the greenhouse and the watering system, so I can jump in if something is wrong, the greenhouse regularly uploads its status (soil moisture level, ambient temperature and relative humidity in the greenhouse) to the internet. Because there is no WiFi available, and we only need to upload small amounts of data (a few bytes at a time), I chose to use LoRaWAN for this. LoRaWAN is a low power, wide area networking protocol. In other words, it’s great for transmitting small amounts of data over relatively long distances (the record stands at over 700km, but in built up areas with cheap antennas a few kilometers is more commonplace).
To transmit the data using LoRaWAN I added a Dragino LoRa shield to the Arduino. I was lucky enough that the greenhouse is within range of a LoRa gateway at Melbourne University a few kilometers away that is part of the The Things Network - a global, open source and open LoRaWAN network. The program running on the Arduino encodes the sensor data into a few bytes, and the LoRa shield transmits that payload to the LoRa gateway at Melbourne University. That gateway is connected to The Things Network, making the data available online. I created an account on AllThingsTalk and connected it to my The Things Network account. AllThingsTalk is a service that lets you quickly create dashboards from sensor (or other) data, so you can easily see what’s going on.
The control software can be found on Github
Materials
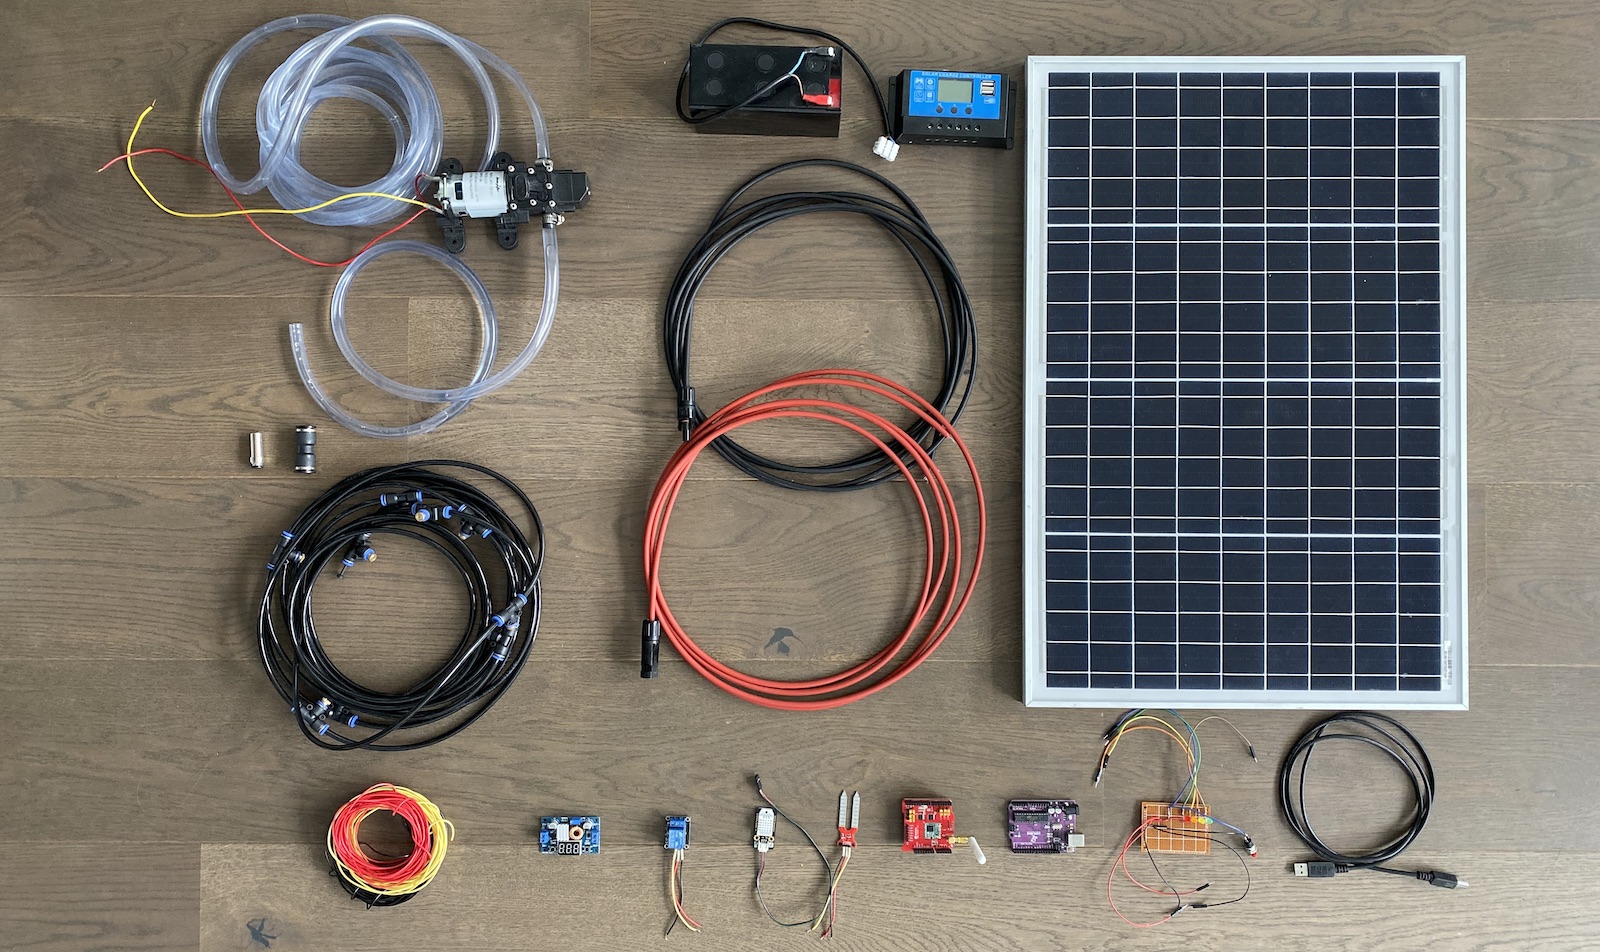
Below is an overview of all components used in the system, as well as what I paid for them.
Prices listed are what I paid. Links are to the supplier I purchased from where possible or the same product from a different supplier if the original supplier is no longer selling the product. Prices shown when following the links may be different than when I purchased. Some of these components (mostly the electronics) could have been sourced cheaper through AliExpress.
| Item | Cost in AUD |
|---|---|
| Water container / rainwater tank | Free |
| Pump | $27.00 |
| Pump tubing | $15.77 |
| Water input filter / strainer | $4.14 |
| Misting tubing and nozzles | $25.65 |
| Reducer between 10mm (pump) to 4mm (misting) tubing | $2.20 |
| Solar panel (40 Watt 12v Polycrystalline) | $40.00 |
| Solar panel leads | $19.98 |
| Charge controller | $14.95 |
| Battery (12V 7.2Ah) | $29.90 |
| USB cable (to power Arduino) | Free |
| Arduino Uno | $19.00 |
| Dragino LoRaWAN shield | $31.26 |
| Soil moisture sensor | $4.95 |
| Temperature and humidity sensor (DHT-22) | $10.89 |
| Relay | $3.96 |
| Buck converter | $6.70 |
| Miscellaneous electronic components (LEDs, resistors, jumper cables, etc.) | Free |
| Total cost | $256.35 |
Findings
First, and most importantly, the system works. Misting automatically turns on based on soil moisture, the button lets you force misting or turn the system off, and with the LoRa setup I can remotely monitor the greenhouse.
There are few teething issues as well. The misting nozzles easily clog leading to water streaming out of the nozzle instead of being dispersed. Cleaning the nozzles with vinegar resolved the issue, but doing that frequently is not desirable.
The low cost moisture sensor only gives a relative reading, so it takes some calibrating to figure out what value of the moisture sensor equates to a desirable level of watering for the seedlings. Having only one moisture sensor for the whole greenhouse (small as it is) is also not ideal as it’s possible for that moisture sensor to not be representative of all seedling pots in the greenhouse. Furthermore this sensor is resistance based and fully exposed to the soil, which will result in corrosion and ultimately failure of the sensor. A capacitive moisture sensor (where the active components aren’t in direct contact with the soil) is a more durable (and somewhat more expensive) option.
It’s also tricky to cover all seedlings with the 10 misting nozzles currently in the system.
Next steps
Based on my experiences so far I’m looking to make the following adjustments:
- Find better quality nozzles that don’t clog so easily.
- Add more nozzles to improve misting coverage
- Lower power consumption. Currently the Arduino is always on even though it’s not doing anything most of the time. Letting it go to sleep when the system is inactive can save some power. (gains would likely be minimal as running the pump is what consumes the most power)
- Allow remote configuration of the system through LoRa / The Things Network. This would allow easy adjusting of the soil moisture level threshold at which to start misting. Currently changing this requires updating the Arduino software, which requires me to take my laptop to the garden, etc.
- Experimenting with intervals and length of watering to optimise for soil penetration.
Possible variations
The system I built was based on the needs and constraints we had in our garden. If you are thinking of building a similar system your needs and circumstances may be different. Here are a few possible variations on this system:
System connected to mains water. Such a system would not require a pump and water reservoir. Instead you would need some way to turn the “tap” on and off automatically, e.g. by using a solenoid valve.
System connected to mains electricity. Such a system would not require the solar panel, charge controller and battery. Instead it requires a power converter for the Arduino (5V) and the pump (12V).
Timer based system. Instead of using a moisture sensor to trigger the watering, you could use a timer based system. This could be done using an Arduino, but could also be done with an off-the-shelf timer.
No remote monitoring. Connecting the system to the internet is optional. You can do without it (especially if the greenhouse is in your own garden). You could also use a different mode of connectivity like WiFi.
References
I was influenced and inspired by these systems other DIY-ers had built before me:
Automatic Solar Powered Greenhouse Watering System
A really nice system. It taught me how to implement the solar / battery part of the system. This system is connected to mains water, turning the water supply on and off using a solenoid valve, which didn’t work for my setup. It uses a simple electronic timer to control the watering cycle. I wanted to take things a bit further and water based on the moisture levels in the soil (although I did build in a fallback to timer based watering in case the sensor fails). This system uses drip irrigation. This wasn’t practical in our greenhouse as we have lots of little pots of seedlings so I opted for misting instead.
Arduino for Greenhouse, Garden or Growbox
Very thorough write-up for an Arduino-based greenhouse automation project. I took a lot of inspiration for the electronics / control design for my project. Unlike this project I did use an off-the-shelf Arduino board and I kept the sensor inputs and overall electronics design a bit simpler. I also added LoRaWAN connectivity to my project.
A neat little automated greenhouse concept. Apart from watering, this project also controls the temperature in the greenhouse. Using fans to bring in cool air from outside the greenhouse is something I’m considering adding to my current setup, as the temperature in the greenhouse regularly reaches 40+ degrees Celsius currently.
This is not a case study of a greenhouse automation project, but an overview of different watering options for greenhouses covering drip irrigation, misting, and capillary matting. Useful when you’re trying to figure out what the best solution is for your setup.